
Schedule Builder
SEMESTER &
CAL POLY MARITIME ACADEMY UPDATES | REGISTRATION | EFFECTIVE FOR FALL 2026 REGISTRATION CYCLE:
Summary of changes:
- There will be four campus locations (campus is a required filter in Schedule Builder)
- AHC - Allan Hancock College
- CCC - Cuesta College
- MAIN - San Luis Obispo MAIN
- SOLA - Cal Poly, Solano Campus
- Course numbers will be four digits in length
- Example: WGQS 145 = WGQS 1145
- Example: DL 105 = DL 1105
- Course section numbers will include a letter to denote location
- C - Cuesta College Campus ONLY
- X - Crosslisted Classes (San Luis Obispo ONLY)
- S - San Luis Obispo Campus ONLY
- M - Solano Campus ONLY
- H - Allan Hancock College Campus ONLY
- V - Virtual Classes
- Registration is conducted in two phases: the initial Enrollment Appointment, followed by Open Enrollment.
- Students will enroll up to 15 units during the initial Enrollment Appointment and waitlist up to 12 units. For Fall 2026, Cal Poly Maritime Academy students will be able to add up to 20 units during their initial enrollment appointment.
- Students can add up to 20 units during Open Enrollment.
- The information below has information pertaining to the old General Education (GE) pattern. Reference 2026 GE pattern website.
This website will be updated with semester information and this new policy in a comprehensive way in July 2026.
Schedule builder is where you:
- Search for classes
- Build and save schedule options
- Enroll, waitlist, and swap classes
To access Schedule Builder: click on Student Center under My Apps in the Cal Poly portal > click on Enrollment (shopping cart icon) > click on Schedule Builder
Schedule Builder lives within the Student Center and works with Degree Planner to create a seamless user experience.
Schedule Builder is only available to students who are term activated in the given term. Students who are not active can still view Cal Poly's online Class Schedule by visiting Class Search.
Tasks
- Alerts
- How to Use Schedule Builder
- Search for a Class
- Add a Class
- Waitlist a Class
- Swap a Class
- Drop a Class
- Understanding Errors and Symbols
- Frequently Asked Questions
- Troubleshooting Resources
For assistance with your my.calpoly.edu User ID and/or password, visit the IT Service desk or contact the Help Desk at 805-756-7000
ALERTS
Schedule Builder Error: Building a class schedule with a course that allows you to enroll multiple times in the same term
Schedule Builder automatically validates your schedule when you select "build schedule." If your schedule contains a course that allows for multiple enrollments in the same term, you will receive the following error:
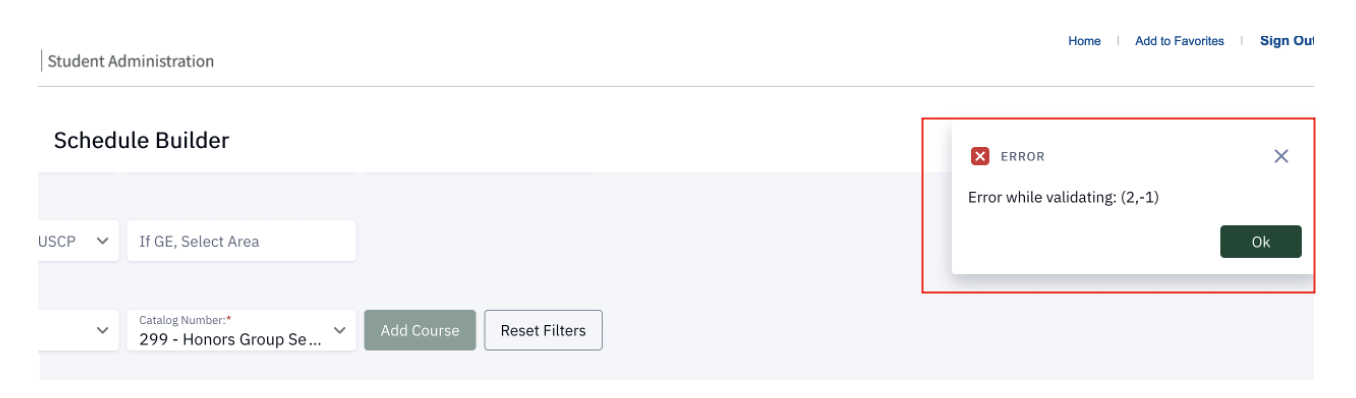
If you are building a schedule that contains a course that allows for multiple enrollments in the same term, add that course directly through your Student Center. Do not validate your schedule prior to registering.
In general, courses that will allow for multiple enrollments in the same term will indicate as such in the Cal Poly Course Catalog.
Example: Total credit limited to 4 units; repeatable in same term.

How to Use Schedule Builder
Step 1: Access Schedule Builder through your Student Center
"My Apps" in the Cal Poly Portal > Student Center > Enrollment > Schedule Builder
You will be greeted by a Welcome Message that displays pertinent information and timely messaging associated with the registration process.
Selecting "Skip this message in the future" will suppress the message for future visits. The message will refresh should the content change.


Step 2: Select the correct term
You can select the correct available term from the Term drop-down menu on the left-hand side of the screen. You should click on the term itself instead of using the carrot to access the drop-down menu.

If you are unable to see a future term, it could mean one of two things:
1) The term is not yet available. Visit the Planning Calendar to review term class schedule availability dates.
2) You are not term activated for the desired term. This means you are unable to register for classes.
Contact the Records Unit within the Office of the Registrar for additional information.
Students may elect to pull in coursework from the Shopping Cart, courses planned in Degree Planner, Enrolled courses, or courses for which they are Waitlisted by using the drop-down menu. It is easy to identify where a course pulled from based on the icon in the Status column (see "Understanding Errors & Symbols" below).

Step 3: Expand Filters, set filter options, and add additional courses
In order to search for courses, select Expand Filters in the upper right-hand corner of the screen.

Unavailable Time Filter
Unavailable Time may be set and used as a Filter when searching for courses. This Filter may be turned off if results are too limited.

Class Status
When searching for courses, Schedule Builder will automatically include only open courses (courses with open seats available).
To view all course offerings, including classes that are closed, full, or have formed a waitlist, uncheck both Class Status filter options (uncheck both "Open" and "Wait List").

Modality of Instruction
There are six different modalities of instruction at Cal Poly: Synchronous (fully online with established meeting times), Asynchronous (fully online with no established meeting times), Sync/Async Hybrid, In Person, In Person/Sync Hybrid, and In Person/Async Hybrid.
Use the "Modality of Instruction" filter to search for courses that fit your needs.

Section Filters
Section Filters may be used to search for courses in specific categories. You may elect to search by GE (General Education) Area, US Cultural Pluralism (USCP) courses, or Graduation Writing Requirement (GWR) courses.
You have the ability to select multiple Section Filters, but Section Filters do not overlap. If you select the GWR filter and the USCP filter, Schedule Builder will include all GWR courses and all USCP courses in the search results.
*Note: If a quick view of all courses that fulfill a specific GE Area is required, Class Search is an easy tool to use to quickly generate this information.


When searching for General Education (GE) courses, you must know your Cal Poly catalog.
*To find your catalog, visit the My Academics tab of your student portal.
Subject and Catalog Number Filters
You may also search directly for a course by entering the Subject and Catalog Number in the drop-down fields. When searching for a course, these two fields are required (note the red asterisk).

Add Course
Use the Add Course button to select the courses Schedule Builder will use to create Class Schedule options. By selecting the course in the sub-navigation, you may elect to further limit which sections are used to build schedules. If you do not select specific sections of the course, Schedule Builder will create Class Schedule options with all available sections.

View Seat Availability
Once the course has been added, you can either click on the course or the "Select Sections" button to view additional class details and seat availability.

Unreserved and reserved seat counts are listed for each section of the class. If you have selected the "Open" Class Status filter, only open sections will appear.
If you selected the "Open" Class Status filter and the "Wait List" Class Status filter, all sections will appear. A yellow exclamation point in the "Wait List Open" column indicates that the section has opened the waitlist. The waitlist counts down to zero from the total positions available (for example 89/99 means that 10 waitlist positions have been taken).

Step 4: Build schedule options
Up to ten (10) courses may be used when building a schedule. Select Build Schedule to see options.

*Results will return up to 100 schedules
Step 5: Evaluate schedule options
Set Favorites
Up to five (5) Favorite schedules may be saved. Indicate that a schedule is a "Favorite" by clicking the heart icon.

A pop up will allow you to name each Favorite schedule.

Compare Schedule Options
You may compare multiple schedules using the Add to compare function.


View Maps
From the schedule, you may view class locations on a map by clicking the three (3) dots in the upper right-hand corner of the screen:

The map feature will provide travel distance between classes:

Step 6: Enroll in classes and review important messaging
Once the desired schedule has been identified, you may Validate the schedule, Add the classes to your Shopping Cart, or Enroll directly in the classes. Select the green "Enroll" button to view these options.


Validate Schedule
This option is helpful prior to your registration appointment. The Validate function will verify whether you meet requisites for the selected courses. Validating prior to your registration appointment will inform you whether a permission number will be needed during the registration process.
Add to Shopping Cart
This option allows you to move classes directly to the Shopping Cart in your Student Center. From there, you may complete the registration process.
Enroll in Classes
You have several options when it comes to completing the registration process. However, enrolling in classes directly from Schedule Builder allows you to enroll in your full schedule of classes at one time.
If enrolling in classes directly from Schedule Builder, select each class and fill in any necessary information related to the enrollment transaction.

Option: Change Grading Basis

Use the drop down to change grading option for the class. Be mindful of policy related to limits for Credit / No Credit grading.

In the example above, the grading basis was changed from "Graded" to "Credit / No Credit."
Option: Add Permission number (For more detailed instructions, see "Add a Class with a Permission Number demo" below.)
Option: Select the "Wait list if class is full" checkbox (For more detailed instructions, see "Add a Class with a waitlist" below.)
Review Messaging
After options have been saved and the Enroll transaction has been processed, you will receive messages associated with each transaction. It is important to read all messages to ensure that the enrollment process was successful.
Green: Success
Red: Errors that need to be reviewed
Yellow: Success, but with messages. It is important to review each message (waitlist placement, course repeat notification, etc.).

PLEASE NOTE: The following message is a standard PeopleSoft message that may appear in your Schedule Builder "Enrollment results" or your Shopping Cart:
"Note that this is a GE and/or USCP course and may fulfill a Bachelor's degree requirement."
If your class was successfully added to your schedule (and you received a green icon in Schedule Builder), please disregard this PeopleSoft messaging.
Search for a Class
You may add classes from the start of your registration appointment time through the 4th day of the “add/drop period.” After the 4th day of the term, a permission number is required to enroll in all classes.
You must know your Cal Poly Catalog to ensure you are searching for correct classes. Undergraduate students can find their catalog on the "Academics" tab of their My Cal Poly Portal (under Degree Information).
Import courses
You have the option to manually pull courses into Schedule Builder. Use the selections under the Import Courses drop-down menu to import courses that are Planned in your Degree Planner, in your Shopping Cart, in which you are Enrolled, or sections in which you are Wait Listed.
*Sections that are set to 'no print' will not appear in Schedule Builder. The class number must be entered directly into the Student Center Shopping Cart to complete the enrollment transaction (Add Class).
- Once in Schedule Builder, click on the dark green "Import Courses" button in the top right corner.
- Click "Planned" to bring in courses from Degree Planner.
- Click on "Shopping Cart" to bring in any courses you previously added to the Shopping Cart.
- Click "Enrolled" to bring in all courses you are currently enrolled in.
- Click "Wait List" to bring in all courses you are currently on the waitlist for.
- Courses will appear at the bottom of the page. Click on "Select Sections" to view dates, times, available seats, and class information.
- When viewing class sections, check the checkboxes on the right-hand side of any sections you want to consider in your schedule. Pay attention to available seats and waitlist capacities.
Search for a general education (GE) course
Using the Section Filters, you can search for courses that fulfill a specific GE Area. Select Add Course to include the specific course as an option when building your schedule.
- Select correct Term.
- If search boxes are not visible, click "Expand Filters" on the right.
- Under the Section Filters heading, click on "Select GE; GWR; or USCP" and select broad GE Area.
- Click on the "If GE, Select Area" box to the right and select specific GE Sub-area using your correct Cal Poly Catalog.
- Under the Course Selection heading, click on "Subject" and choose subject prefix.
- Click on "Catalog Number" and select course. All courses listed will meet the GE criteria you set in steps 3 and 4. Note that when selecting multiple Course Attributes (i.e. General Education and USCP), results will include all courses that meet either attribute, not only courses that meet both attributes.
- Click on "Add Course."
- The course will appear at the bottom of the page. Click on "Select Sections" to view dates, times, available seats, and class information.
- When viewing class sections, check the checkboxes on the right-hand side of any sections you want to consider in your schedule. Pay attention to available seats and waitlist capacities.
Search for a specific course
You must enter a Subject and Catalog Number (as noted by the red asterisk) if you are searching for a specific course. Course description and prerequisite information will display when the Subject and Catalog Number fields have been filled. Select Add Course to include the specific course as an option when building your schedule.
- Select correct Term.
- If search boxes are not visible, click "Expand Filters" on the right.
- Under Course Selection heading, click on "Subject" and choose subject prefix.
- Click on "Catalog Number" and select course.
- Click on "Add Course."
- The course will appear at the bottom of the page. Click on "Select Sections" to view dates, times, available seats, and class information.
- When viewing class sections, check the checkboxes on the right-hand side of any sections you want to consider in your schedule. Pay attention to available seats and waitlist capacities.
Search for Graduation Writing Requirement (GWR) | United States Cultural Pluralism (USCP)
- Select correct Term.
- If search boxes are not visible, click "Expand Filters" on the right.
- Under the Section Filters heading, click on "Select GE; GWR; or USCP" and select one of the following: Graduation Writing Requirement or United States Cultural Pluralism.
- These types of courses do not have "sub-areas," so the "If GE, Select Area" field does not need to be populated.
- Under the Course Selection heading, click on "Subject" and choose subject prefix.
- Click on "Catalog Number" and select course. All courses listed will meet the criteria you set in step 3. Note that when selecting multiple Course Attributes (i.e. General Education and USCP), results will include all courses that meet either attribute, not only courses that meet both attributes.
- Click on "Add Course."
- The course will appear at the bottom of the page. Click on "Select Sections" to view dates, times, available seats, and class information.
- When viewing class sections, check the checkboxes on the right-hand side of any sections you want to consider in your schedule. Pay attention to available seats and waitlist capacities.

Search for an open class
First, select "Expand Filters":

Next, under "Class Status," check "Open."

Now when you search for a course, the results returned will only include courses with open seats. Note that you will need to review the seat availability details for each course, as some seats may be held for specific majors or populations.
Search for a course by modality
Cal Poly offers six different modalities of instruction:
Asynchronous classes are virtual classes taught in a self-guided format. There are no required weekly meeting days and times. The meeting pattern will be "TBA" in Schedule Builder.
Synchronous classes are virtual classes taught in a guided format. There are required weekly meeting days and times, and students are required to log in for class instruction of some sort.
Synchronous/Asynchronous Hybrid classes are fully online, but the meeting pattern is a combination of established days and times (for the synchronous online component) and student self-guided work (for the asynchronous online component).
In Person classes are offered at on-campus or off-campus physical locations with established meeting days and times. Location information (building number and room number) can be found in Schedule Builder for these sections.
In Person/Synchronous Hybrid classes include in-person and online course content. These classes have established meeting days and times.
In Person/Asynchronous Hybrid classes include in-person and online course content. The meeting pattern is a combination of established days and times (for the in-person component) and student self-guided work (for the asynchronous online component).
NOTE: When searching for in-person classes, results will also display Independent Study and/or Supervisory classes (such as Senior Project classes). In general, meeting patterns for these classes will be listed as "TBA" as students will be required to coordinate requirements with the instructor. Even though these classes will display as "in person" offerings, this does not specifically mean class content will be delivered face-to-face.
To find classes that fit your needs, use the "Modality of Instruction" filter:
Helpful information when searching for a class
Knowing which sections have open seats
Unreserved and reserved seat counts are listed for each section of the class. If you have selected the "Open" Class Status filter, only open sections will appear.
If you selected the "Open" Class Status filter and the "Wait List" Class Status filter, all sections will appear. A yellow exclamation point in the "Wait List Open" column indicates that the section has opened the waitlist. The waitlist counts down to zero from the total positions available (for example 89/99 means that 10 waitlist positions have been taken and 89 positions remain).
Class seats may be reserved for a specific student population. Students who meet the criteria for the reserved seats can enroll in the class; those who do not meet the criteria will be added to the waitlist. Refer to the class notes to verify if you meet the criteria. To determine the number of reserved seats and for which student populations they are being held, click on the section and look in bottom right corner.

Class notes
Class notes can be found in two locations:
1.) Class notes are seen as you select sections for a class. They are viewable prior to drilling down into the expanded class information.

2.) After selecting "Build Schedule," class notes can be found in the calendar view of your schedule.

When you click on a class in the calendar view, a text box appears that allows you to either "View" or "Pin" the class.

Select "View" to find more details, including class notes.

Prerequisites
Prerequisites are courses you must complete in order to enroll in a subsequent course (or courses). Prerequisites can also include class standing (such as "Junior standing" in the example below). All course descriptions will have prerequisites listed.
If you try to register for a course but have not yet met the prerequisite(s), a pop-up warning will appear. You may either Cancel and adjust your course options or Continue. If you continue and you do not meet the prerequisites, please note that you will be prevented from enrolling in the course without a permission number.

Favorite Schedules | Saved Schedules
You may elect to save up to five (5) Favorite schedules. Indicate that a schedule is a "Favorite" by clicking the heart icon. Once a schedule is saved, you can return to it any time by clicking on "Favorites" at the top of the screen. These will save even if you exit Schedule Builder.
A pop-up window will allow you to name each Favorite schedule.
Members of the Advising community have access to assist students in Schedule Builder. An Advisor may act on a student's behalf and set Favorite schedules. This is typically done during an advising session. You will always see the individual's name who made adjustments or changes in Schedule Builder

Add a Class
You can add classes anytime between your registration appointment and the 4th day of the “add/drop period” via your Student Center or your Schedule Builder.
Registration at Cal Poly is divided into two different rounds, and you will have a registration appointment assigned for each round. More information can be found on the Enrollment Appointments webpage.
The “add/drop period” is the first 8 days of instruction of the term during which you may continue to add and/or drop classes. After this period, adding and dropping classes is not allowed, although, you may “withdraw” from a class(es) under specific circumstances. See the Planning Calendar for specific dates.
A permission number is required to add any class during the last 4 days of the add/drop period.
How to add a class in Schedule Builder video
Build a Schedule and Enroll in Classes
In Schedule Builder, you can create schedules with all of your desired classes and enroll in or add yourself to the waitlist for all classes at once.
- Add courses to your Schedule Builder (see "Search for a class" instructions above) and click on "Select Sections" next to each one to choose sections you would like to consider (based on seat availability, instructor, time, etc.)
- On the main Schedule Builder screen, check all classes you want to consider together in creating your schedule (select the checkbox next to each class).
- Click "Build Schedule."
- Schedule Builder will create calendars for all possible schedules with the classes and sections you choose on the previous screen. Click through the calendars to find your preferred schedule. (Tip: use the "heart" icon to save schedules to your Favorites. This will allow you to quickly come back to your favorite schedules the next time you are in Schedule Builder.)
- When you are ready to enroll during your registration appointment or during Open Enrollment, click on "Enroll" above your preferred schedule.
- Check the checkbox next to each of the classes you would like to enroll in and click "Enroll." (Tip: Use the "Validate" button to double-check that you meet all prerequisites for the course and are eligible to enroll.)
- Click on the link for each of the classes you would like to enroll in.
- Choose the Grading option for the class, enter a Permission Number (optional, if needed), and check the "Wait list if class is full" checkbox (if desired). When selecting the Grading option, be mindful of policy related to limits for Credit / No Credit grading.
- To set up a "swap," choose a class from the "Drop the class below if Enrolled in the Class above (optional)" section. See Swap a Class information below.
- Click "Save."
- Click "Enroll."
- For each class that you "Enroll" in, a pop-up box will appear letting you know whether you were successfully enrolled, if you were added to the waitlist/your waitlist position, or if you were unable to enroll in the course for any reason.
Add a Class
- When ready to enroll during your registration appointment or during Open Enrollment, open Schedule Builder and build your preferred schedule. Click on "Enroll" above the calendar.
- Check the checkbox next to the class you would like to enroll in and click "Enroll."
- Click on the link for the class you would like to enroll in.
- Choose the Grading option for the class, enter a Permission Number (optional, if needed), and check the "Wait list if class is full" checkbox (if desired). When selecting the Grading option, be mindful of policy related to limits for Credit / No Credit grading.
- To set up a "swap," choose a class from the "Drop the class below if Enrolled in the Class above (optional)" section. See Swap a Class information below.
- Click "Save."
- Click "Enroll."
- For each class that you "Enroll" in, a pop-up box will appear letting you know whether you were successfully enrolled, if you were added to the waitlist/your waitlist position, or if you were unable to enroll in the course for any reason.
Add a Class with a waitlist
See Waitlist a Class section below for information on waitlist policies and FAQs.
- When ready to enroll during your registration appointment or during Open Enrollment, open Schedule Builder and build your preferred schedule. Click on "Enroll" above the calendar.
- Check the checkbox next to the class you would like to enroll in and click "Enroll."
- Click on the link for the class you would like to enroll in.
- Choose the Grading option for the class, enter a Permission Number (optional, if needed), and check the "Wait list if class is full" checkbox. When selecting the Grading option, be mindful of policy related to limits for Credit / No Credit grading.
- To set up a "swap," choose a class from the "Drop the class below if Enrolled in the Class above (optional)" section. See Swap a Class information below.
- Click "Save."
- Click "Enroll."
- For each class that you "Enroll" in, a pop-up box will appear letting you know whether you were successfully enrolled, if you were added to the waitlist/your waitlist position, or if you were unable to enroll in the course for any reason.
Add a Class with a Permission Number demo
Permission numbers are required to add classes during the last four days of the add/drop period and are obtained from the instructor of the class you are hoping to add. Permission numbers can also override class prerequisites (requirements) if the instructor or department give consent.
Permission numbers cannot override time conflicts or the 22 unit enrollment limit.
You have the option to enter a permission number for a course under Enrollment Options when adding a class in Schedule Builder.

- When ready to enroll during your registration appointment or during Open Enrollment, open Schedule Builder and build your preferred schedule. Click on "Enroll" above the calendar.
- Check the checkbox next to the class you would like to enroll in and click "Enroll."
- Click on the link for the class you would like to enroll in.
- Choose the Grading option for the class, enter the Permission Number for the class, and check the "Wait list if class is full" checkbox (if desired). When selecting the Grading option, be mindful of policy related to limits for Credit / No Credit grading.
- To set up a "swap," choose a class from the "Drop the class below if Enrolled in the Class above (optional)" section. See Swap a Class information below.
- Click "Save."
- Click "Enroll."
- For each class that you "Enroll" in, a pop-up box will appear letting you know whether you were successfully enrolled, if you were added to the waitlist/your waitlist position, or if you were unable to enroll in the course for any reason.
How to add a permission number video
Waitlist a Class
When a class is full, you may choose to waitlist for that class. Once the waitlist is created, enrollment can only occur through the waitlist process unless the department or the instructor issues a permission number that overrides the waitlist (note that this happens under rare circumstances).
It is YOUR RESPONSIBILITY to remove yourself from the waitlist(s) of the class(es) you no longer wish to be enrolled in.
Waitlist process
- Class seats may be reserved for a specific student population. Students who meet the criteria for the reserved seats can enroll in the class; those who do not meet the criteria will be added to the waitlist. Refer to the class notes to verify if you meet the criteria. To determine the number of reserved seats and for which student populations they are being held, click on the section and look in bottom right corner
- Schedule Builder will display the number of open seats, the number of reserved seats (if any), the number of taken seats, and the number of students on the waitlist. The waitlist number indicates the number of waitlist seats taken and counts down to zero. For example, 95/99 would indicate 4 people are on the waitlist.

- The waitlist process (i.e., the automatic process of adding students on the waitlist into the class if seats become available) runs nightly starting the first day of registration through the first day of instruction. Again, it is your responsibility to remove yourself from the waitlist(s) of the class(es) you no longer wish to be enrolled in.
- During the first 4 days of instruction, the waitlist process runs at noon and once at night.
- After the 4th day of instruction, the waitlist will cease to exist. From the 5th day of classes until the end of the add/drop period, it is up to the instructor to allow students to enroll in their class by issuing them a permission number. Reference the Planning Calendar for specific dates
- If you choose to remain on the waitlist of a class, you should attend all class sessions in case you are enrolled through the waitlist process.
- Some faculty require attendance in the first class session and may choose to drop students who fail to attend without forewarning, even if they are enrolled in the class through the waitlist process.
Waitlist rules
Waitlist Rules:
Refer to the Student Center page for rules on waitlisting.
Waitlist a Class demo
You have the option to waitlist when enrolling in the course under Enrollment Options. Select the "Wait list if class is full" check box.
You have the option to set up a swap with a waitlisted class when enrolling under Enrollment Options. Select the desired class from the drop down box that appears after selecting "Wait list if class if full".

Swap a Class
Swapping a class is the process of exchanging one course you are enrolled in for another course, as long as there are open seats in the new class and you do so before the registration deadline. It allows you to adjust your schedule without dropping a class completely. The process involves both dropping the old class and enrolling in the new one at the same time to make sure you don't take too many credits in a term or lose your spot in the original course
When swapping a class from a waitlist, if a spot were to open from the waitlist course, then the system will automatically drop you from the class you indicate and add you to your preferred class if you do not have a time conflict.
It is recommended that you set up a swap when making changes to your schedule instead of dropping courses and attempting to add new ones.
Swap a Class demo
1. Follow the Schedule Builder "Add a Class" instructions up until the enrollment options.
2. Within the enrollment options of the class you want to swap into, click the option to "waitlist if class is full."
3. This will create another option to choose "Drop the class below if Enrolled from the Class above." From that drop-down menu, choose the class you want to swap out of.
4. Finish the enrollment process.
5. If a seat is available in the class you want to enroll in, the swap will be completed immediately. If there are no seats available, you will be waitlisted in your desired class and remain enrolled in the original class. If space opens in the class and you become eligible to move off the waitlist, the system will automatically drop you from the class you indicated and enroll you in your preferred class.
Set up a swap
1. Follow the Schedule Builder "Add a Class" instructions up until the enrollment options.
2. Within the enrollment options of the class you want to swap into, click the option to "waitlist if class is full."
3. This will create another option to choose "Drop the class below if Enrolled from the Class above." From that drop-down menu, choose the class you want to swap out of.
4. Finish the enrollment process.
5. Since there are no seats available, you will be waitlisted in your desired course and remain enrolled in the original class. If space opens in the class and you become eligible to move off the waitlist, the system will automatically drop you from the class you indicated and enroll you in your preferred class.
6. Verify you have set up a swap by clicking on Enrollment on the left and selecting "Drop a Class Option". This will show your current schedule of classes and which ones you are enrolled in, waitlisted for, or have setup a swap for.

Drop a Class
Students cannot drop their classes in Schedule Builder. Refer to Student Center for Drop instructions.
Understanding Errors and Symbols
"Class Status" error
To view all class offerings, including classes that are closed, full, or have formed a waitlist, uncheck both Class Status filter options.
First, select "Expand Filters":
Next, under "Class Status," uncheck both the "Open" option and the "Wait List" option. Removing the Class Status filter entirely will ensure that your search results include all classes regardless of class status.
Various symbols in the class section information
Planned - Courses are brought over from Degree Planner, planned coursework

Enrolled - Section in which the student is enrolled

Wait List - Section in which the student is on the waitlist
![]()
Shopping Cart - Section that has been added directly into the Shopping Cart
![]()
Zero Cost Course materials or Open Education Resources

Closed Leaf - Sustainability Focused

Open Leaf - Sustainability Related

Warning (yellow) or error (red) message
It is important to read all messages carefully when registering via Schedule Builder.
A green symbol means there are no warnings or errors associated with the enrollment process.
A red symbol means there is an error which must be fixed. A red symbol indicates the enrollment process was not successful.
A yellow symbol indicates a warning associated with the transaction. This is generally an advisory message.
Frequently Asked Questions
Cannot find a class
Sections that the department has set to "no print" will not publish in Schedule Builder. For a section where you have been given the class number to enroll, you must do so directly from the "Add" option via your Student Center.
Textbooks
In the class section information, once confirmed by the instructor, there will be a link to "Course Materials." This link will take you directly to the Bookstore website to view and purchase required course material as needed.

Variable Unit Course
Variable unit courses will have the option to set the unit value before completing the registration process. Use the "Units*" field to select the number of units in which you would like to enroll.

View class schedule
Check your class schedule for the term to review what classes you have been successfully enrolled in. You can view your schedule in your Schedule Builder or in the "My Schedule" section of your Student Center. If there are outstanding questions, contact the Records Unit within the Office of the Registrar or the Advising Center in your college. Refer to contact information under Troubleshooting Resources.
PLEASE NOTE: The following message is a standard, common PeopleSoft message that may appear in your Schedule Builder "Enrollment results" or your Shopping Cart:
"Note that this is a GE and/or USCP course and may fulfill a Bachelor's degree requirement."
If your class was successfully added to your schedule (and you received a green or yellow message in Schedule Builder), please disregard this PeopleSoft messaging.
Topic for a course
Classes with topics are viewable when selecting sections in Schedule Builder. There is a drop-down menu that can be used to search for specific topics associated with that course.
Cal Poly Faculty and Staff FAQs
Faculty & Staff | How to gain security access to view Schedule Builder
To gain security access to Schedule Builder, you will need to submit a Technical Service Request. The Technical Service Request link can be found in the “My Apps” menu of your Cal Poly Portal.
Once you click on the "Technical Service Request" link, you will be directed to the Employee Technical Support page. From here, select the "New CMS Account Request" option:

When you submit your request, please include detailed information explaining why you need access to this student tool.
PLEASE NOTE: In order to receive security access, you must have taken the FERPA training through the Cal Poly Learning Hub within the last year.
You can access the FERPA training course through the "Staff and Faculty Training" tab on your Cal Poly Portal. Once there, click on the "Go to the Cal Poly Learning Hub" green button and search for the “Data Security and FERPA” training.
Please allow about an hour and a half to complete the training.
Faculty and staff member | Using schedule builder on behalf of student
Faculty and staff must act on behalf of students when using Schedule Builder. As there is no general view in Schedule Builder, the platform should not be used for enrollment monitoring purposes. To monitor enrollment, faculty and staff can use any of the following: Class Roster, Class Search, and/or Enrollment Management Dashboards.
To act on behalf of a student, access your Advisor Center and select "Lookup Student."
You may enter either the student's name or their EMPL ID in the "Search Criteria," but it is recommended that you use the student's EMPL ID:

Next, navigate to the student's Student Center, and Select "Schedule Builder." This will allow you to view that student's Schedule Builder (please keep in mind that you will be acting on behalf of the student).
NOTE: The following path should NOT be used to access a student's Schedule Builder: HighPoint > Schedule Builder
For more detailed instructions on how to navigate the Advisor Center, please refer to the Advisor Center User Guide.
Troubleshooting Resources
For Technical Assistance:
Office of the Registrar, University Scheduling
For Registration Issues:
Office of the Registrar, Records Unit
For Curriculum-Related Assistance:
Mustang Success Center (First-year students)